Laser Cutting a tower model
Posted: February 22, 2016 Filed under: Subject 3rd Year Leave a comment

These 1mm thick card components come together to form a simple tower that I designed on rhino with grasshopper. Using the Grasshopper plugin for Rhino I designed a quick, abstract strange shaped organic-ish column form that I then booleaned out of a simple rectangular column. This file went though 123D Make and Illustrator where I made a second deriving from the original. This is greatly abstracted and uses fewer pieces and is significantly larger. A post will follow showing the 2 complete towers.

GIF Experiments
Posted: February 19, 2016 Filed under: Subject 3rd Year Leave a commentAs part of my fast prototyping for sculpture ideas I decided to record the process of rapid model building. I thought I would like to make a ‘gif’ of the process. As I constructed the first circle system from laser cut 5mm cardboard. I took a photo as each module was added, as the structure began to grow. All of these photos were then opened in GIMP (open source version of Photoshop) each to its own layer, and then using the make gif function I set the frame rates I required and then it is exportable as a gif file. When opened in a photo viewer it automatically starts. It went smoothly, I quickly followed tutorials on youtube and seemed to know what I was doing pretty quickly. To each layer you can apply all sorts of effects, speed up and slow down the frame rate for individual frames and much more. I will be making more in the future I think.


Working with DFX files in Illustrator
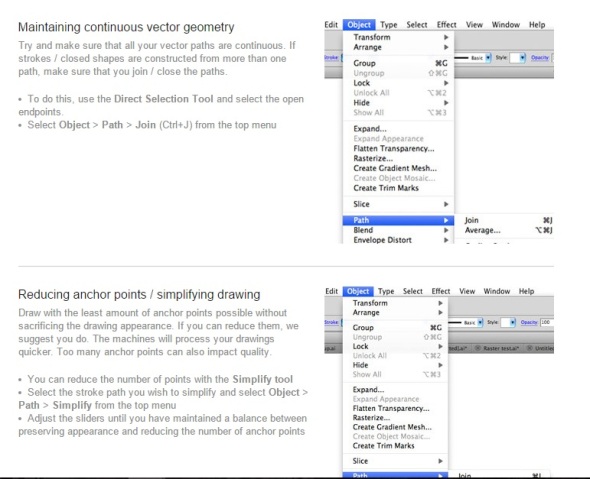
Posted: February 19, 2016 Filed under: Subject 3rd Year Leave a commentTo get my files ready for laser cutting (those that have been sliced in 123D Make) I need to import them into Illustrator to set line widths and to scale, orientate the work and ensure the artboard is the correct size. I was having some problems with too many anchor points and too many un-closed lines. I trawled a few forums for solutions to little avail, other than to find many others experience these problems also. The fact is the file format and illustrator don’t seem to work terrifically well together – just my luck. One favored option seemed to be installing a plugin which makes things run smoother, but I was not wanting to faff around with plugins just yet.
I eventually found some form of salvation in the site www.cutlasercut.com where I found some advice with getting rid of unnecessary bits and cleaning up my files. This is the part I found particularly useful:
The site has all kinds of other useful information on the subject of laser cutting and drawing software.
So now I have finished preparing my column file which is to be sliced into 1mm card. If it works out and looks good Ill try out another version in 3mm acrylic.
Finished ‘Molecule’ Sculpture
Posted: February 19, 2016 Filed under: Subject 3rd Year Leave a commentAfter about 20 minutes of gluing I produced this.


I want to produce more models this way, in 123D Make you can also make models that use less material. A few points for next time:
- Card this thick (10mm) is a bit to thick and therefore slow to use as multiple passes are needed.
- In Illustrator be sure to set the numbers as raster lines.
- Thinner material next time.
- Be sure to remove unnecessary cut lines in Illustrator.

Cutting the ‘Molecule’ Form
Posted: February 19, 2016 Filed under: Subject 3rd Year Leave a comment 
A few posts back on the 17th of February I showed some prep work to making a fast laser cut cardboard model. The card is pretty thick at 10mm so I slowed the cutting speed a few percent and upped the power a couple of percent. I’m using the 45W Epilog Helix Laser cutter/engraver.


Circle, Ellipse and Hexagon Systems
Posted: February 18, 2016 Filed under: Subject 3rd Year Leave a commentThis model composed of slotted circle modules was made in response to the earlier triangle version that I took forward into metal for my formative assessment. I wanted to explore other basic shapes to make other variations on the earlier work and see what kind of results I could come up with. The modules are larger with more possible connectors than the triangle system, making for more ‘open’ structures that seem to expand and ‘grow’ more. 


Once I had made this circle system I moved into ellipses and made a similar size structure.

Once I had constructed these I began considering scale. What if I laser cut loads of modules and could make a much bigger structure? I designed yet another simple system that slotted together out of the same 5mm cardboard, which I am using do to its suitability to fast model making. Although I do enjoy its material qualities. This time I used hexagons, believing I would be able to make large honeycomb like structures. When it came to build I again played around with it and then settled on a pattern to repeat into a large structure.

This structure looked pretty good but was very precarious and wobbly. It collapsed after a bit tomorrow I intend to reassemble the hexagon ‘modules’ into a new structure and combine them with some of my earlier models. I will make a gif or maybe a time lapse of this process.

Ready for tomorrow’s build.

Columns
Posted: February 18, 2016 Filed under: Subject 3rd Year Leave a comment Thinking about 3D fractal forms back in November I made this column. In my mind I had imagined it ‘squiggling’ through space in a complex, dense three dimensional form. Imagine a dense squiggle curve drawn in 3 dimensions. Then the 3D ‘fractal’ pattern follows the squiggle resulting in a dense, complex form. I am going to try and illustrate this as a computer model using grasshopper. 


Pointy Clouds
Posted: February 18, 2016 Filed under: Subject 3rd Year | Tags: abstract sculpture, point clouds, spacial structures Leave a comment 


Before my formative assessment I made laser cut card models of the sculpture I wanted to build. I ended up like the models and so moved into using sheet steel to realise my sculpture outcome. During the build of the sculpture I slotted together 11 steel triangle units and then suspended it from the ceiling next to my large sculpture. I was immediately struck by how it looked hanging in space so here I am returning to that idea with my card models to experiment further.
I have been thinking about formalist and constructivist art and how to use their principles that I am inspired by with digital technologies. A way I have thought of to do this is to make large sculptures or structures which encompass large volumes of space, using modules or units to create small forms that then reside scattered through a space, like clouds, suspended. Then perhaps a sense of a larger volume or defined space can be felt or seen. In this small model I have used thread to suggest a three dimensional object/space defined by the triangle clouds. Let’s see how this all plays out…..
Formative Assessment
Posted: February 17, 2016 Filed under: Maker, Subject 3rd Year Leave a commentI let the blogging slide before Christmas, and I made quite a lot of work that I want to show here. Only problem is there’s quite a lot to show. I think the best way for me to cover that time span is to do a long post of pictures with captions in making order as much as possible, and then more detailed posts for things I want to go into detail more on. I generally take quite a lot of photos so I selected the best and as few as possible to present or document the process. I will throw in the odd paragraph where I think its needed, most of that content will be from notes I have kept at the time of making etc.
At the time of my pitch for my ideas for my degree show body of work (October) I wrote that my pitch had gone ok-ish. Ingrid said to me at the time that the context, concept was there but the nub and the physical starting point was not. In my pitch meeting it was suggested that I take something whether visual, concept, data, a subject and use it to make some form. I was not to worry about the subject or connotations of the start point , as it was just a device to get started making the types of forms I wished to create. The starting point does not become what the work is about but rather just a part of the works process. In my pitch I described being inspired by Olarfur Eliasson’s library of forms, a goal we set for me was to begin my own library of forms using ‘fast’ materials and just prototype and develop form ideas that interested me. The main points to then come out of my pitch presentation were:
- An exploration of form.
- I should investigate formalism, minimalism, the post digital aesthetic, microscopic forms, post modern and contemporary architecture.
- Explore a combination of scanned and modeled form…approach the same form from two different aspects.. the digital and the hand crafted.
- Am I specifically interested in working with a digital aesthetic or a non digital one?
As my formative was approaching I was to get decided to make some ‘fractal’ triangle forms that I had been experimenting with in card and laser cutting. After discussions with Pip and Zoe I decided to make this form as large as I could from a sheet of 8″ x 4″ mild steel. Soon I was well into making a steel ‘triangles’ sculpture and semed to forget all else (hence why I am writing this now).


On the 10th of December straight after my formative assessment I wrote that it had gone well. I wrote that I needed to continue my library of forms (currently doing) and to start scanning them as well as my triangle sculptures to create the ‘skins’ of these objects. This could be done by collecting object point clouds and then using the point clouds to make objects. The objects can then be produced as rapid prototypes. Another more immediate and physical way to do this is to stretch thick stretchy cotton over my forms.
My verbal feedback for my formative assessment happened on the 11/01/2016. Here Ingrid suggested I should be thinking about how my viewer will see my work. Are my works phenomenological forms? a collection of modernist sculptures? what are the contrasts, relationships between the collection of forms, how do the pieces inhabit space? Am i trying to prove anything?
I have a lot to do, a lot of ideas to make, a context to cement and a show to make…
Prepping 3D model for laser cutting.
Posted: February 17, 2016 Filed under: Maker, Subject 3rd Year | Tags: #3-D Printing, card models, laser cutting Leave a commentFor a quick experiment and to work out a work flow for making strange forms that I create in Rhino quickly in reality so that I have a physical model to consider and experiment with. The first I create something in Rhino, with this example I was inspired by Tara Donovan’s (See my post) ‘Untitled Molecule‘ sculpture. So I quickly boolean unioned together load of randomly placed spheres of random sizes. This is just a test.
Once created I then ran the model through a couple different programs to get it to where I can go about laser cutting a quick, low resolution version of the model I designed on Rhino.
Below the steps are illustrated via a series of screenshots of the process.

Rhino was used to really quickly produce a form.

The Rhino model is saved as an stl. file and imported into 123D Make. Here I played with the settings such as card thickness, dowel placement, slice orientation and scale.

From 123D Make with the file saved as dfx. format the sliced model was opened in Illustrator and fitted to art boards. The lines are a mixture of vector and raster (cutting and engraving). The file will be sent to the laser cutter from Illustrator.

As a side thought I thought i would try a small 3D print, so the original Rhino stl. file was opened in Cura where I set up a quick print. This is an experiment to see how the Ultimaker copes with weird geometries. I am interested to see how the intersections between spheres turns out (probably badly). I also need to get used to support structures and how to use them.

Recent Comments